Single Sign-On in ASP.NET with Microsoft Entra ID (Azure Active Directory)

What is Single Sign-On or SSO?
Single Sign-On (SSO) is an authentication process that allows users to access multiple applications or systems with a single login credential. Instead of remembering and entering separate login credentials for each application, users authenticate once and gain access to all the connected systems without needing to log in again. For example, if you log in to Gmail and try to go to Google Drive, the browser will automatically redirect you to Drive without asking for authentication again because it is already signed in for Gmail.
What is Microsoft Entra ID?
Microsoft Entra ID is the new name of Azure Active Directory. Microsoft Entra ID is a cloud-based identity and access management service, that provides functionalities such as user authentication, access control, and identity protection for applications and services that run on the Microsoft Azure cloud platform and also for applications that integrate with it, such as ASP.NET Core applications.
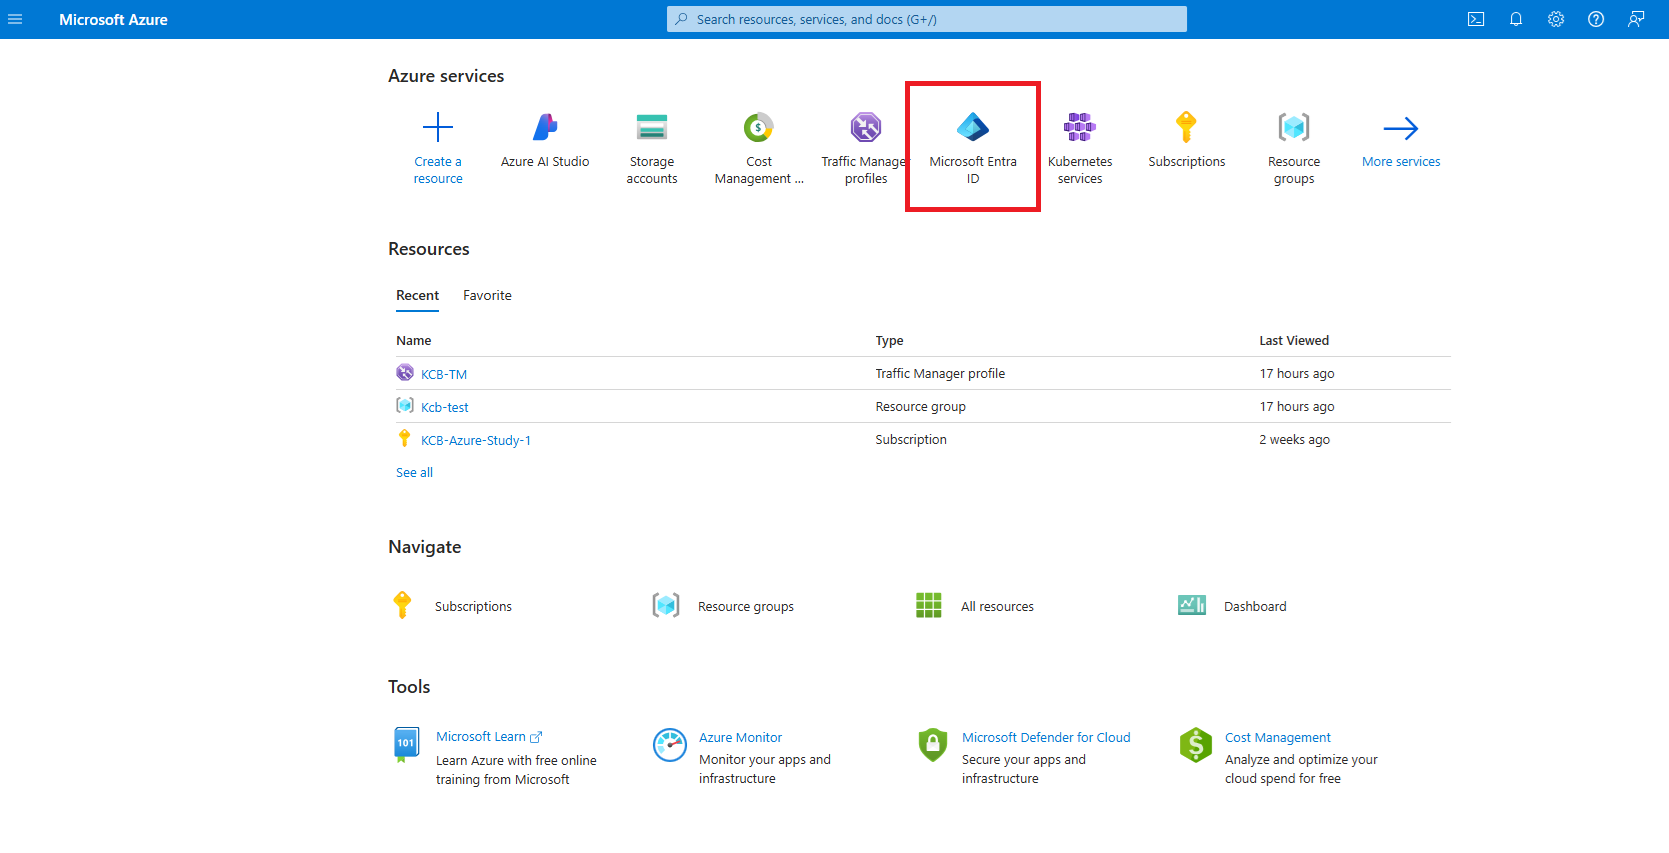
App Registration
First, we have to register the app. If we go to the Azure Portal, search and then click on the “Microsoft Entra ID” we will be forwarded to the Default Directory page, on the left side we will get the “App registration” link. (You can go there from the Azure portal or by this link https://entra.microsoft.com)
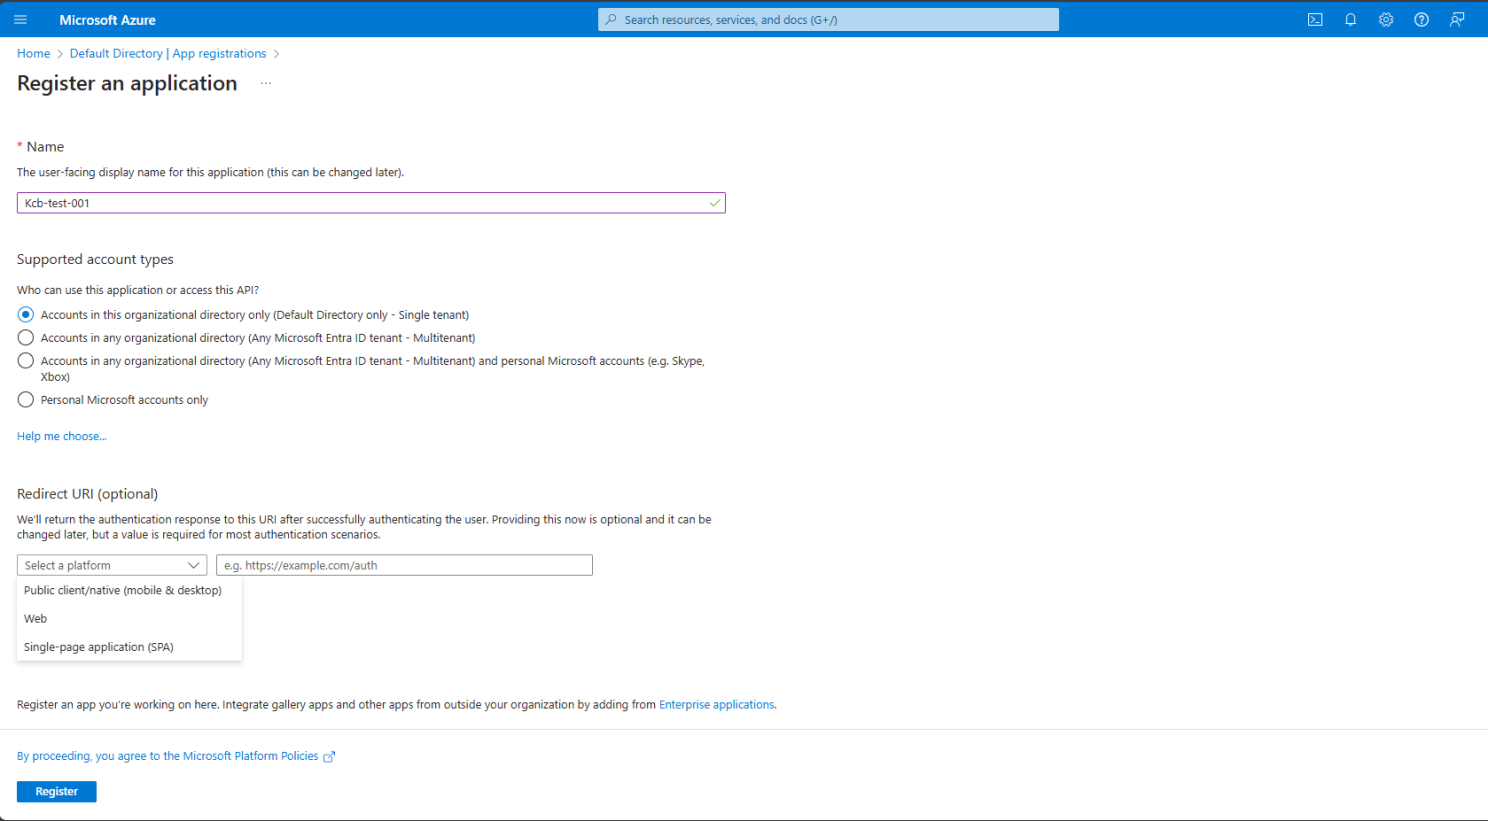
The following page will open. Provide an app name, then select the supported account type and select your platform from (Public Client/native, Web, Single-page application (SPA)) and provide your redirect URI — it means after the authentication it will be redirected to this URI.
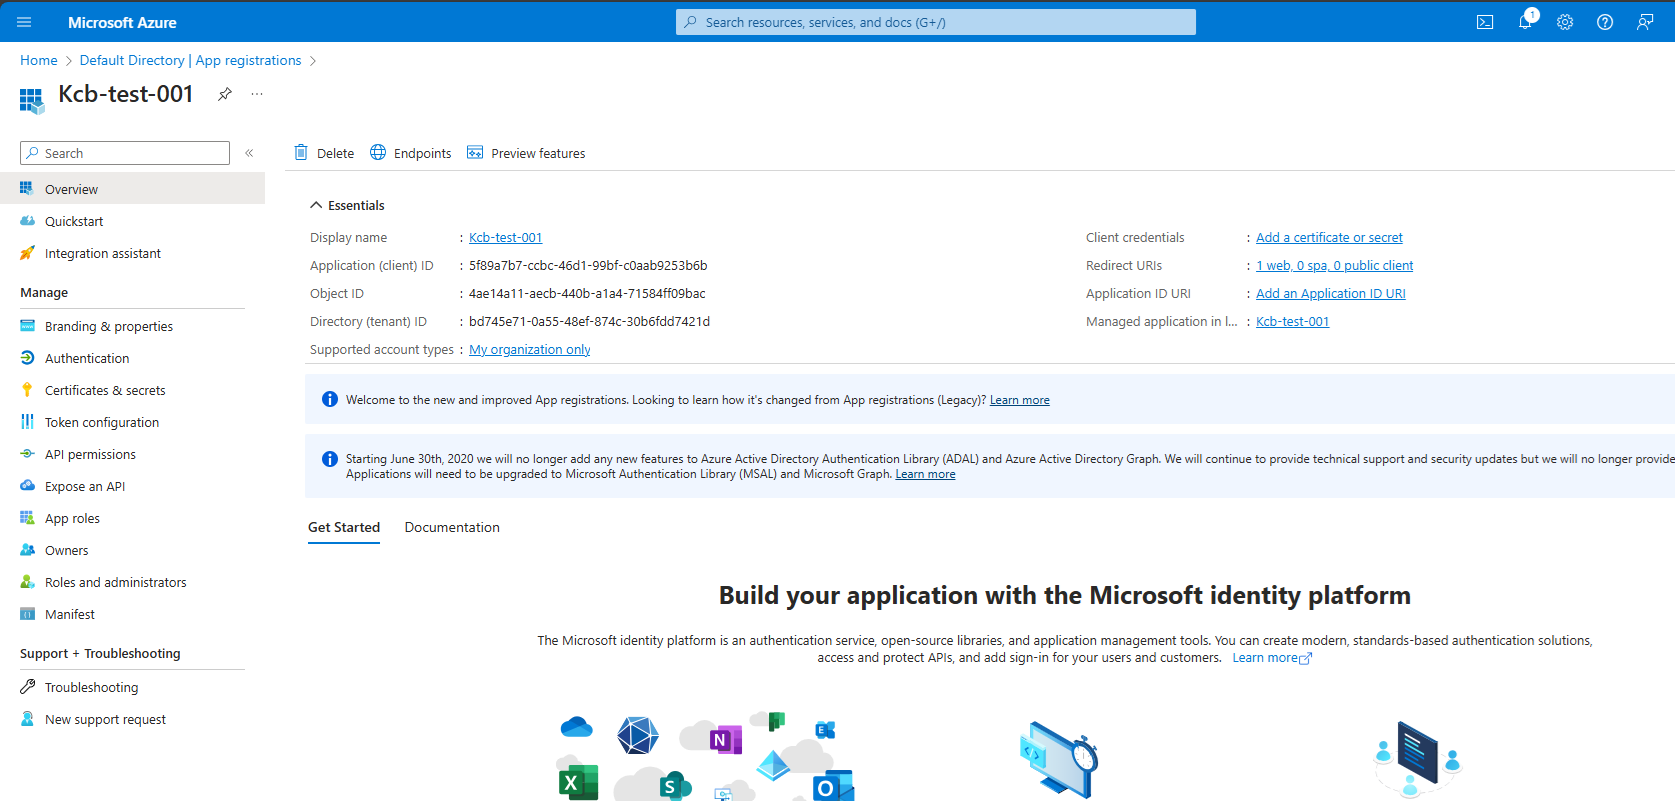
Now clicking on the register button the app will be registered and you will be forwarded to an app detail page.
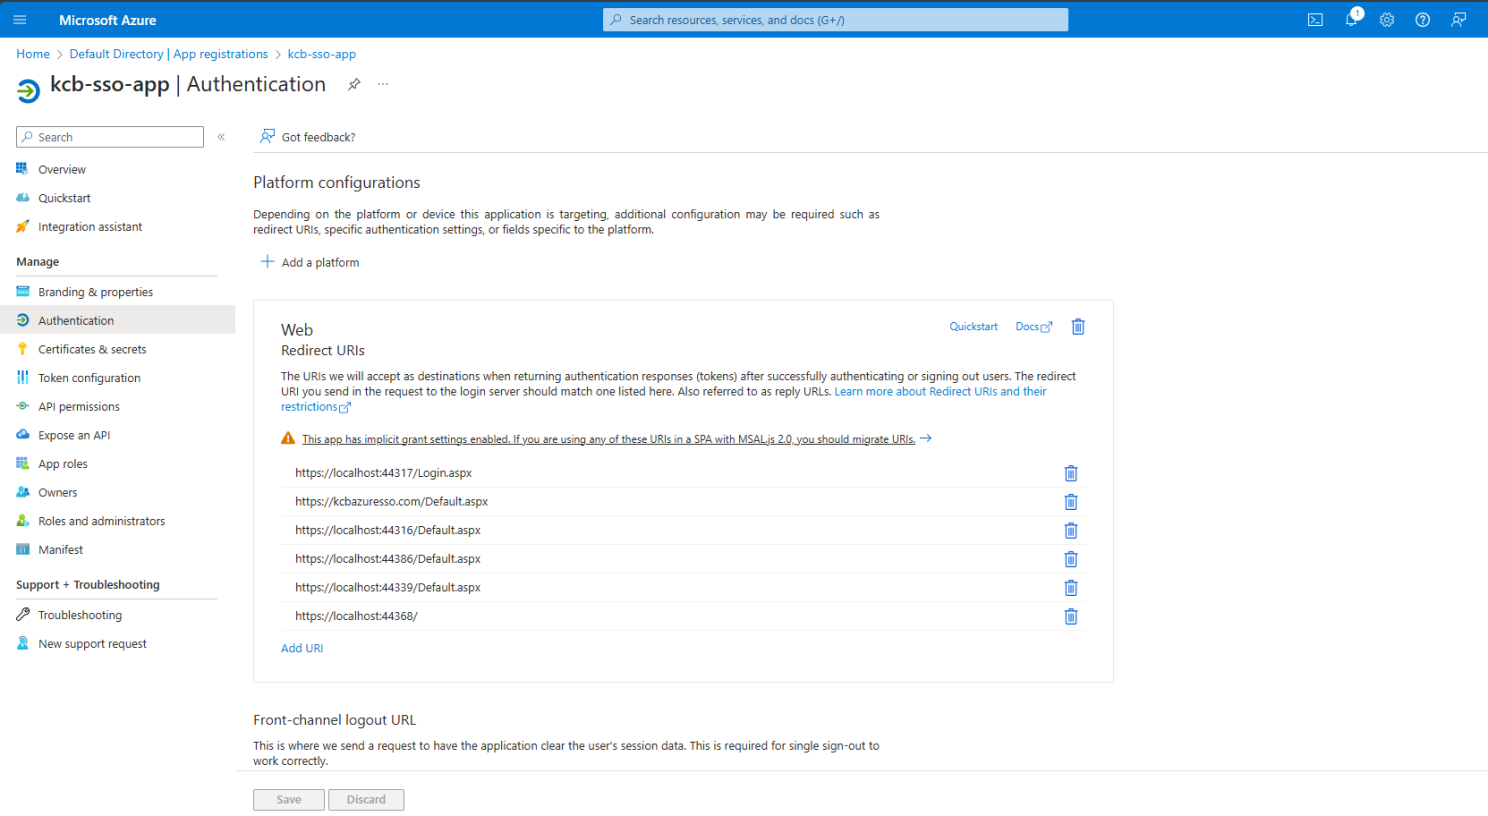
In the authentication link, you will be able to add multiple links, which means you can use this app from different applications — you have to add the redirected URI here.
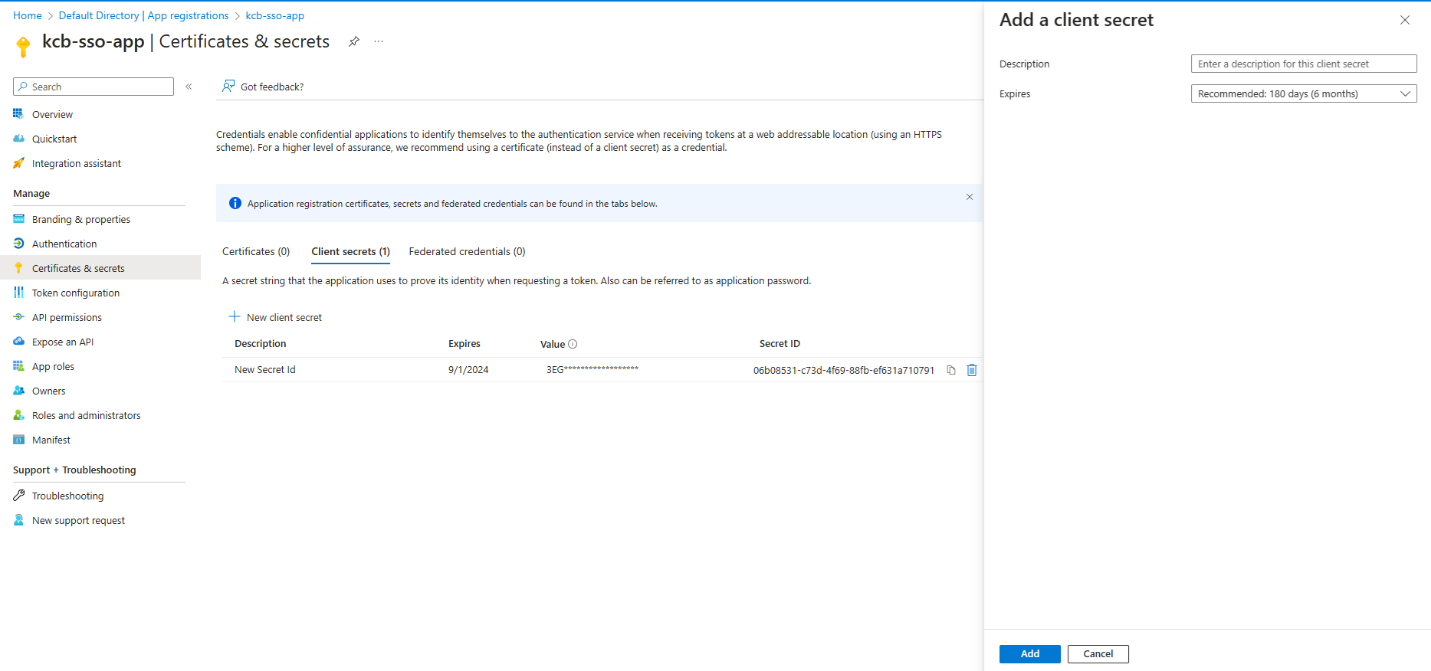
On the Certificate & Secrets link, click on “Client Secrets”. You can add client secrets from here — on the right side give a description and expiration time then add. (Copy this secret, it will be needed later in the ASP.NET project.)
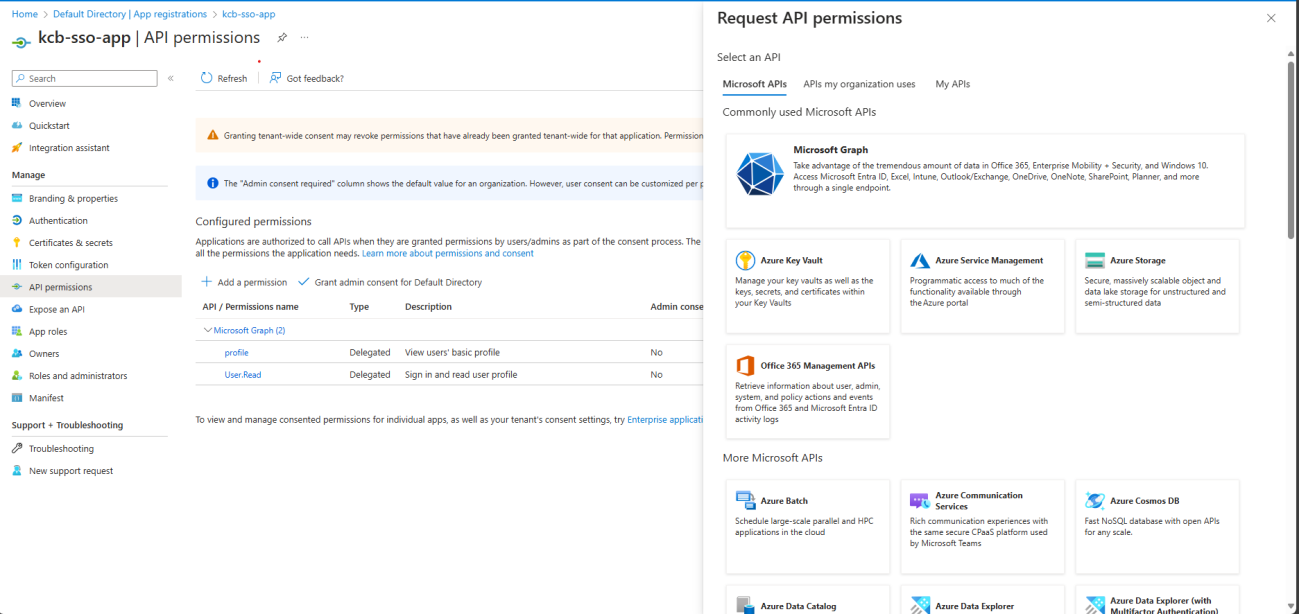
You can add API permissions, which means those APIs will be accessible by this identity.
Adding Users
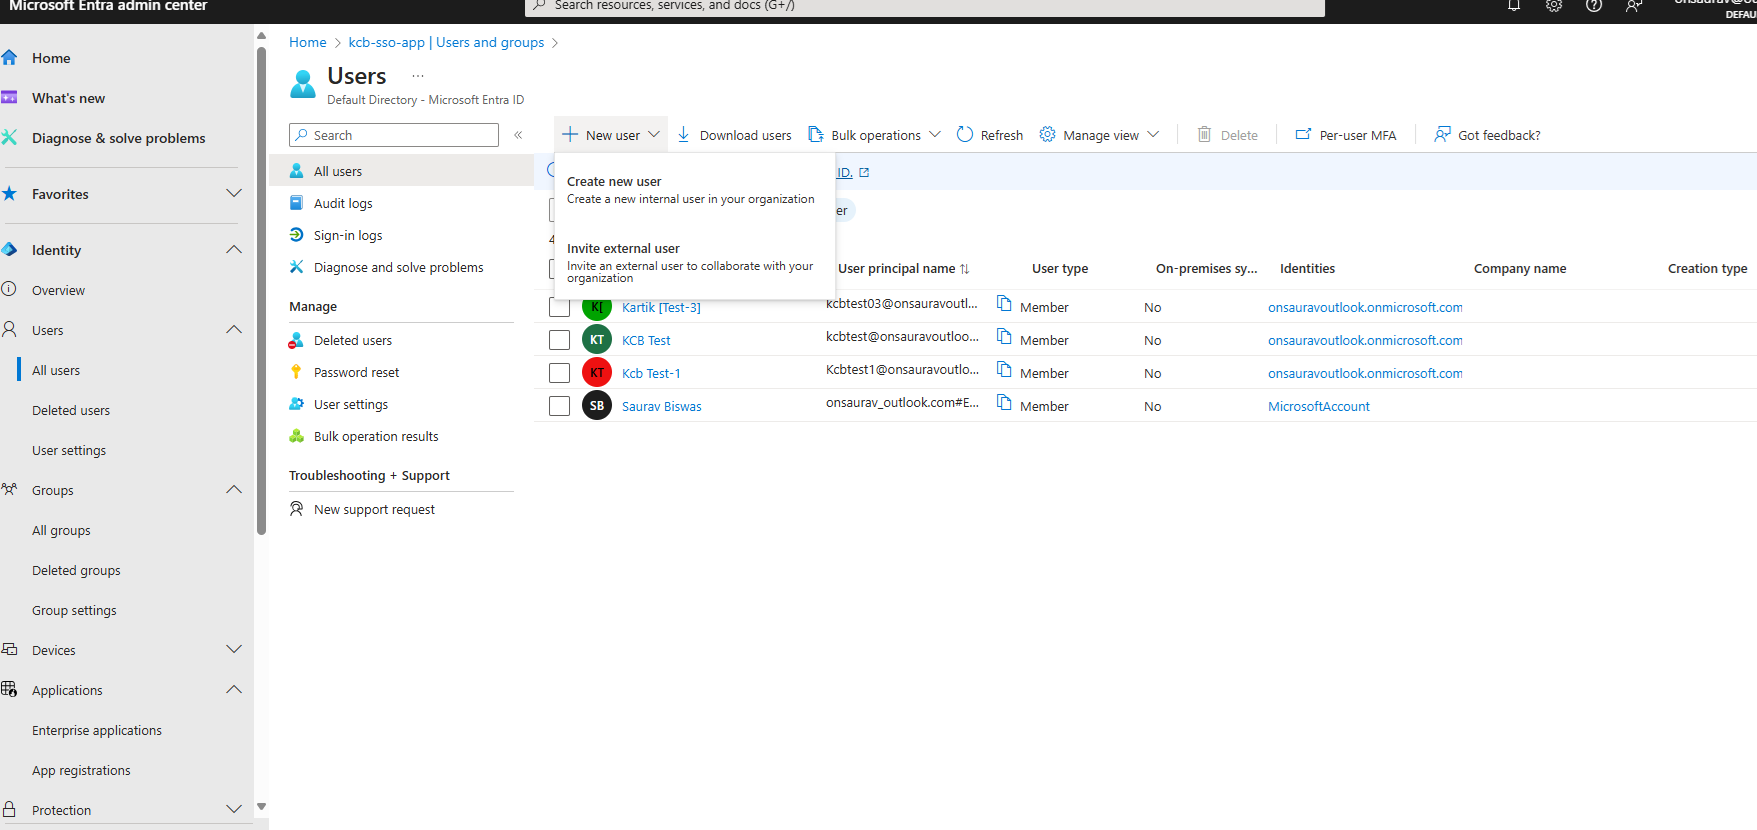
The app is registered, and now you can add users in Active Directory/Microsoft Entra ID. Login here https://entra.microsoft.com, then go to Identity → Users and add new users. You can add the Role and Group of the user here.
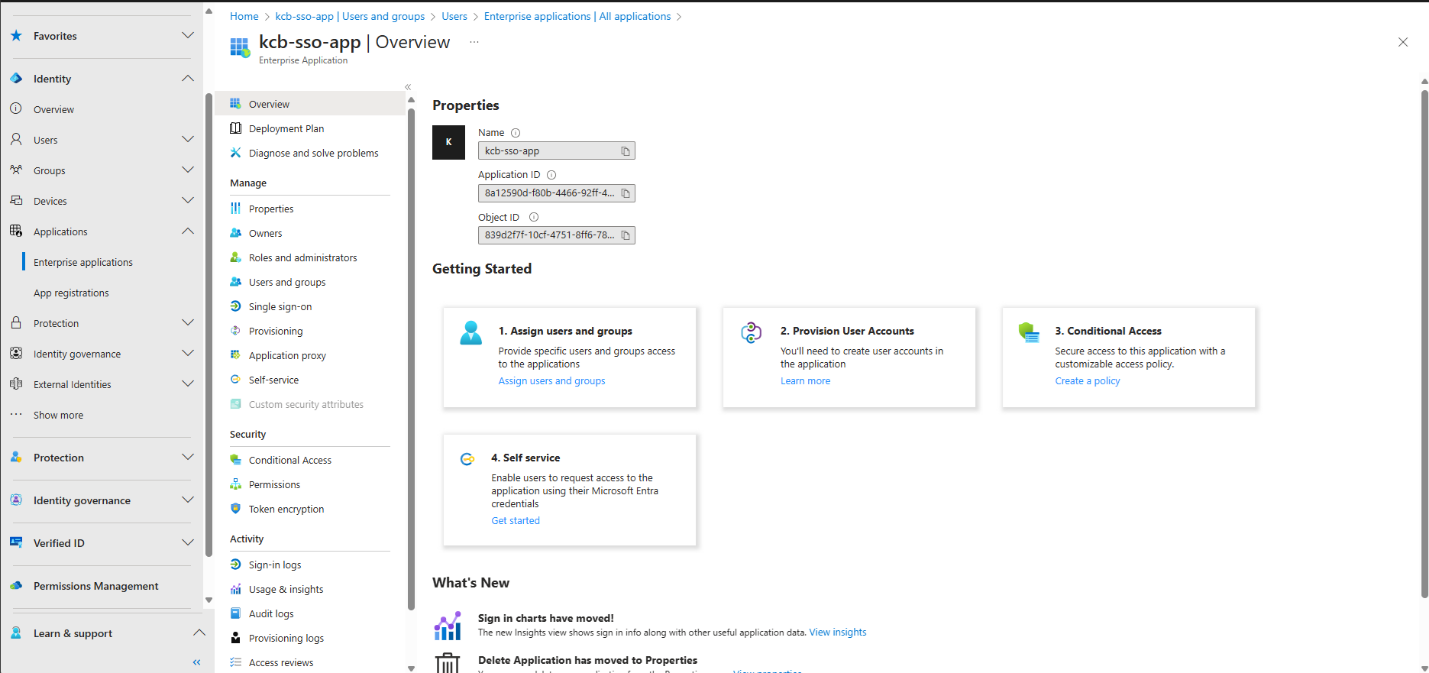
Now, go to Identity → Applications and select your registered app. Here you will be able to add your users to your application — so now this user has access to this app.
From the Dashboard/Overview, click Endpoints and you will get all the links we need for different purposes.
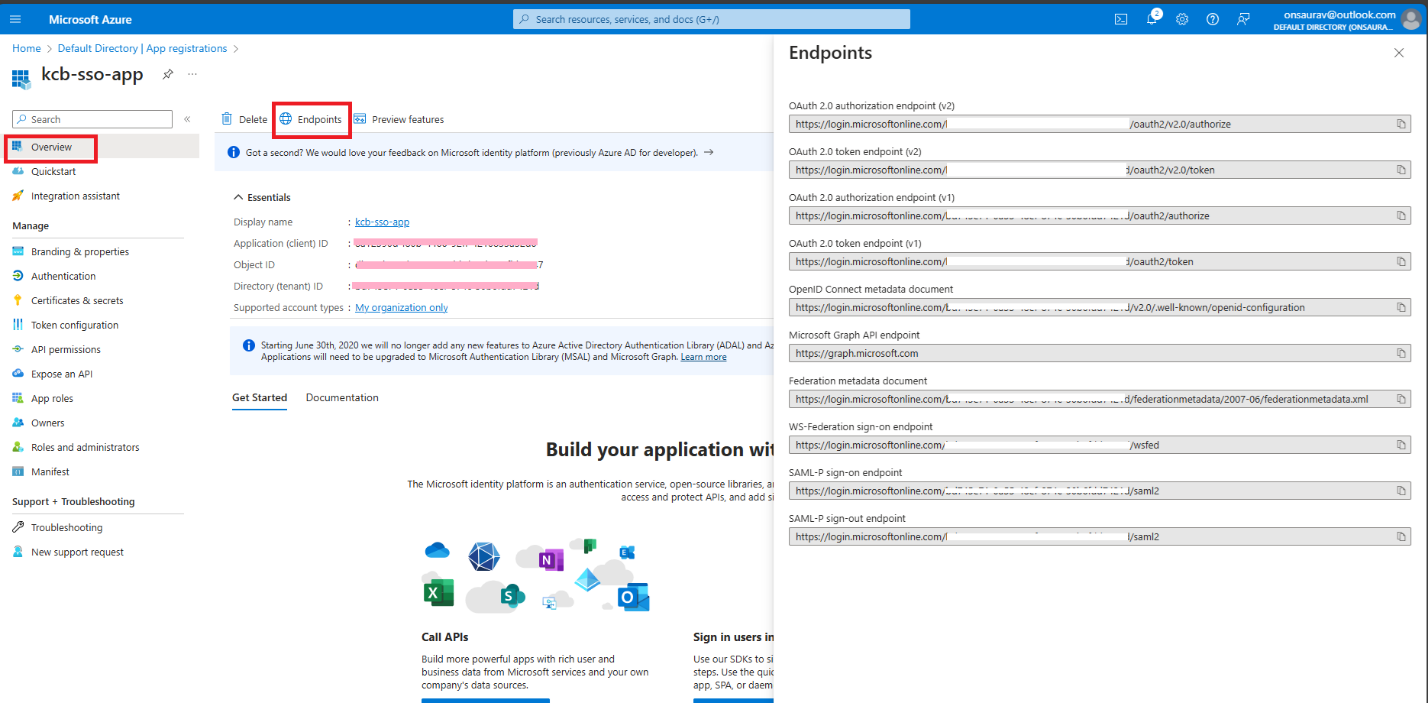
In the pink colour, you will get the Client ID and Tenant ID — copy those IDs for your application, we will be using those.
Setting up the ASP.NET Project
Create a new web application (I am using WebForm, but you can use this way in any type of web application). Add the following NuGet packages:
Install-Package Microsoft.IdentityModel.Protocols.OpenIdConnect
Install-Package Microsoft.Owin.Security.OpenIdConnect
Install-Package Microsoft.Owin.Host.SystemWeb
Install-Package Microsoft.Owin.Security.Cookies
Update your Web.config to store a few important keys, so we can easily use them when needed in our application:
<appSettings>
  <add key="ClientId" value="Client-Id" />
  <add key="TenantId" value="Tenant-Id" />
  <add key="RedirectUri" value="https://your-site-address" />
  <add key="PostLogoutRedirectUri" value="https://your-site-address/" />
  <add key="ClientSecret" value="Client-Secret" />
</appSettings>
If you are using ASP.NET Core then use this in Program.cs or Startup.cs, or if you are using Framework then add a class called Startup.cs and add the following code:
using Microsoft.IdentityModel.Protocols.OpenIdConnect;
using Microsoft.Owin;
using Microsoft.Owin.Security;
using Microsoft.Owin.Security.Cookies;
using Microsoft.Owin.Security.OpenIdConnect;
using Owin;
using System.Threading.Tasks;

[assembly: OwinStartup(typeof(KcbPractice.FW.WebForm.Startup))]
namespace KcbPractice.FW.WebForm // your project's namespace will be here
{
    public class Startup
    {
        public void Configuration(IAppBuilder app)
        {
            app.SetDefaultSignInAsAuthenticationType(CookieAuthenticationDefaults.AuthenticationType);

            app.UseCookieAuthentication(new CookieAuthenticationOptions());

            app.UseOpenIdConnectAuthentication(new OpenIdConnectAuthenticationOptions
            {
                ClientId = System.Configuration.ConfigurationManager.AppSettings["ClientId"],
                Authority = string.Format("https://login.microsoftonline.com/{0}",
                    System.Configuration.ConfigurationManager.AppSettings["TenantId"]),
                RedirectUri = System.Configuration.ConfigurationManager.AppSettings["RedirectUri"],
                PostLogoutRedirectUri = System.Configuration.ConfigurationManager.AppSettings["RedirectUri"],
                ClientSecret = System.Configuration.ConfigurationManager.AppSettings["ClientSecret"],
                ResponseType = OpenIdConnectResponseType.IdToken,
                TokenValidationParameters = new Microsoft.IdentityModel.Tokens.TokenValidationParameters
                {
                    ValidateIssuer = true
                },
                Notifications = new OpenIdConnectAuthenticationNotifications
                {
                    AuthenticationFailed = context =>
                    {
                        context.HandleResponse();
                        context.Response.Redirect("/Error");
                        return Task.FromResult(0);
                    }
                }
            });
        }
    }
}
The Pages
Now create two pages. In this project, I have created Login.aspx and Default.aspx. In my application, I set Login.aspx as default — so when this application runs, the Login.aspx.cs page will be executed first. Here are the page-wise codes:
1. Login.aspx
<%@ Page Language="C#" AutoEventWireup="true" CodeBehind="Login.aspx.cs"
    Inherits="KcbPractice.FW.WebForm.Login" %>

<!DOCTYPE html>
<html xmlns="http://www.w3.org/1999/xhtml">
<head runat="server">
    <title></title>
    <link rel="stylesheet"
        href="https://maxcdn.bootstrapcdn.com/bootstrap/4.0.0/css/bootstrap.min.css"
        integrity="sha384-Gn5384xqQ1aoWXA+058RXPxPg6fy4IWvTNh0E263XmFcJlSAwiGgFAW/dAiS6JXm"
        crossorigin="anonymous">
    <style>
        body, html {
            height: 100%;
            margin: 0;
        }

        .centered-form {
            display: flex;
            justify-content: center;
            align-items: center;
            height: 100%;
            background-color: #f2f2f2;
        }

        .form-container {
            width: 350px;
            border: 1px solid lightgray;
            border-radius: 10px;
            padding: 20px;
            background-color: lightgray;
            box-shadow: 0px 0px 10px rgba(0, 0, 0, 0.1);
        }

        .form-container hr {
            border: 0;
            border-top: 1px solid #ccc;
            margin: 10px 0;
        }
    </style>
</head>
<body>
    <form id="form1" runat="server" class="centered-form">
        <div class="form-container">
            <asp:Label ID="lbnStatus" runat="server"
                Text="Please sign to enter the secured site througn MEI-SSO"
                CssClass="form-text"></asp:Label>
            <hr />
            <asp:Button ID="btnSignIn" runat="server" Text="Sign In"
                CssClass="btn btn-secondary" OnClick="btnSignIn_Click" />
        </div>
    </form>
</body>
</html>
2. Login.aspx.cs
using Microsoft.Owin.Security;
using Microsoft.Owin.Security.OpenIdConnect;
using System;
using System.Web;
using System.Web.UI;
using System.Web.UI.WebControls;

namespace KcbPractice.FW.WebForm
{
    public partial class Login : System.Web.UI.Page
    {
        protected void Page_Load(object sender, EventArgs e)
        {
            if (Request.IsAuthenticated)
            {
                Response.Redirect("~/Default.aspx");
            }
        }

        protected void btnSignIn_Click(object sender, EventArgs e)
        {
            HttpContext.Current.GetOwinContext().Authentication.Challenge(
                new AuthenticationProperties { RedirectUri = "/" },
                OpenIdConnectAuthenticationDefaults.AuthenticationType
            );
        }
    }
}
3. Default.aspx
<%@ Page Title="Home Page" Language="C#" MasterPageFile="~/Site.Master"
    AutoEventWireup="true" CodeBehind="Default.aspx.cs"
    Inherits="KcbPractice.FW.WebForm._Default" %>

<asp:Content ID="BodyContent" ContentPlaceHolderID="MainContent" runat="server">
    <main>
        <section class="row" aria-labelledby="aspnetTitle">
            <h1 id="aspnetTitle">Kcb-Practice [FW WebForm]</h1>
            <hr />
        </section>

        <div class="row">
            <div>
                <h2>Welcome to this secured page!</h2>
                <asp:Label ID="lblUserName" runat="server" Text="Label"></asp:Label>
                <asp:Button ID="btnSignOut" runat="server" Text="Sign Out"
                    CssClass="btn btn-danger" OnClick="btnSignOut_Click" />
            </div>
        </div>
    </main>
</asp:Content>
4. Default.aspx.cs
using Microsoft.Owin.Security;
using Microsoft.Owin.Security.Cookies;
using Microsoft.Owin.Security.OpenIdConnect;
using System;
using System.Configuration;
using System.Web;
using System.Web.UI;

namespace KcbPractice.FW.WebForm
{
    public partial class _Default : Page
    {
        protected void Page_Load(object sender, EventArgs e)
        {
            if (!Request.IsAuthenticated)
            {
                Response.Redirect("~/Login.aspx");
            }
            else
            {
                if (!IsPostBack)
                {
                    if (Session["UserName"] == null && User.Identity.IsAuthenticated)
                    {
                        Session["UserName"] = User.Identity.Name;
                    }

                    lblUserName.Text = "Welcome, " + (string)Session["UserName"];
                }
            }
        }

        protected void btnSignOut_Click(object sender, EventArgs e)
        {
            HttpContext.Current.GetOwinContext().Authentication.SignOut(
                new AuthenticationProperties { RedirectUri = ConfigurationManager.AppSettings["PostLogoutRedirectUri"] },
                OpenIdConnectAuthenticationDefaults.AuthenticationType,
                CookieAuthenticationDefaults.AuthenticationType
            );
        }
    }
}
Running the Application
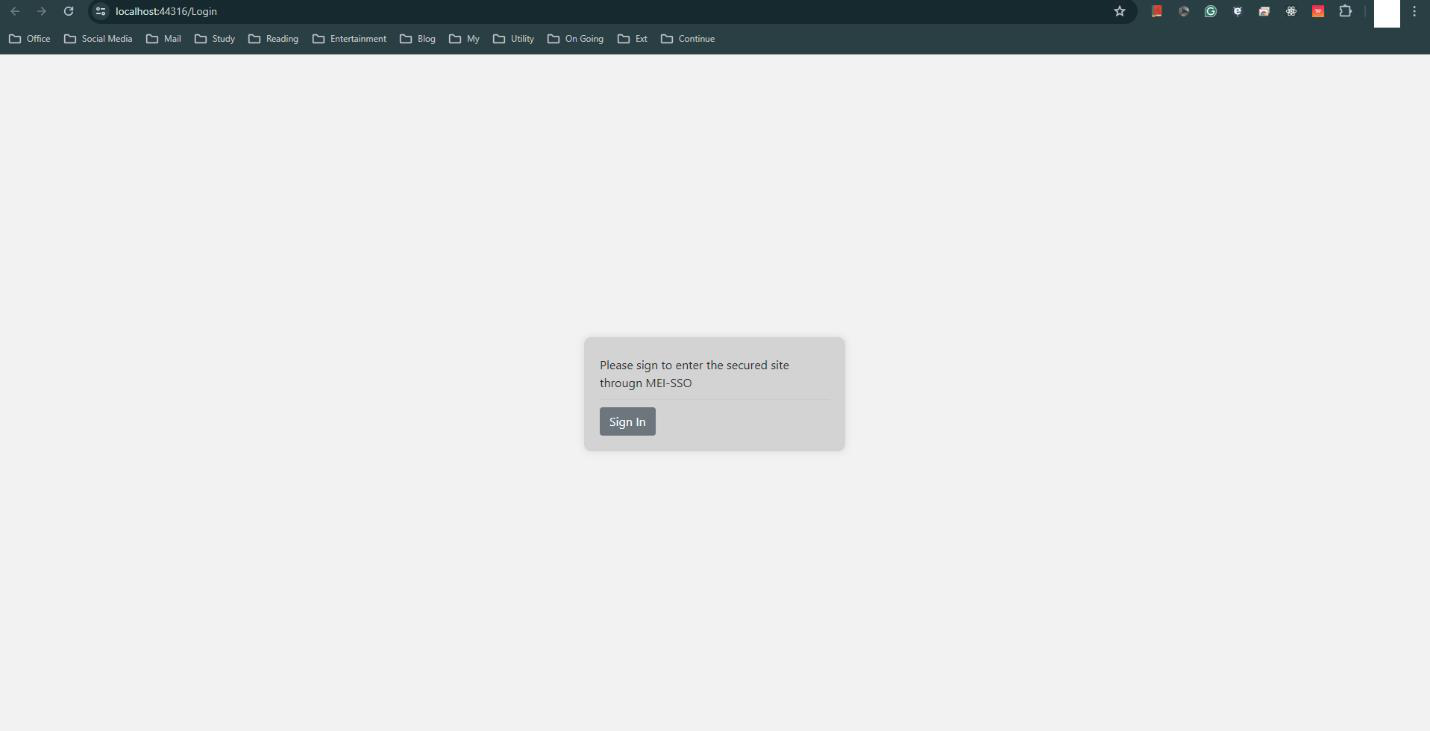
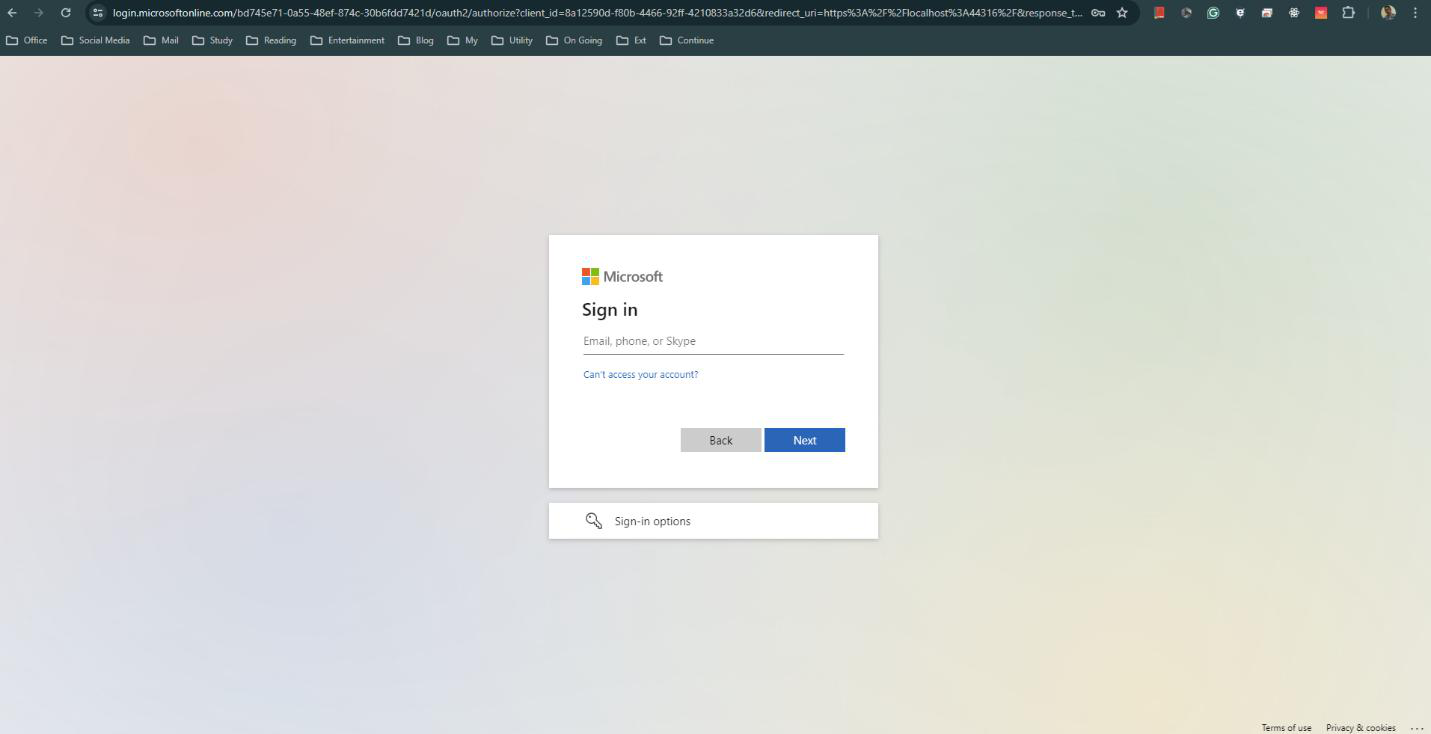
The Login form where it is asking for sign-in — when you click on Sign In it challenges the identity and a Microsoft login screen will appear.
Provide the right email and password or related information. If it authenticates, then it will be redirected to the Home/Default page.
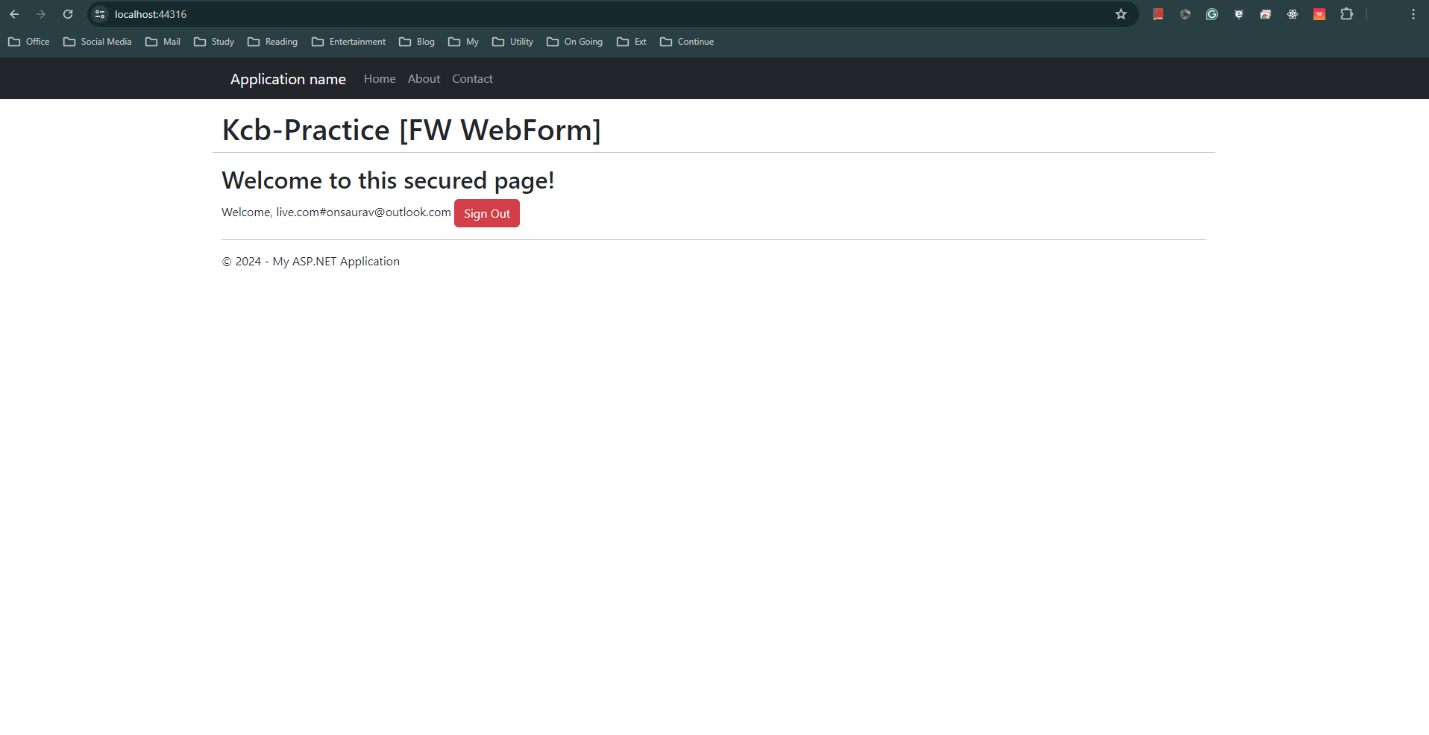
Here you go — you are safely landed on the Home page, after authentication through Microsoft Entra ID. If you log out it will then send you to the login page again.
My friend, that’s all. Thanks for being with me so far.